Showing posts with label For the Home. Show all posts

Friday, October 18, 2013

Sophia's Room is Done...again


It has been several months since I embarked revamping Sophia's room from her former nursery.  It was sweet before, but I wanted more color.  I made a new valance and roman shade, a quilt, pillows, and I replaced the closet doors with a curtain to match the valance.


Please ignore the wall decals to the left.  I have already informed Grandma that we don't want those for Christmas ever again.  There is just no way for them to look nice.


I made two 20x20" pillows with a vintage hankkerchief sewn onto the middle.


I added some crochet edging from thrift store pillowcase.


This room is teeny-tiny and just doesn't have room for two closet doors to take up square footage, so I replaced them with a simple curtain.  I put Sophia's doll house under her hanging dresses in the closet so she can still access them to play.  


Click here to see my Pinterest inspiration for this room.  
Many of the inspiration rooms had lots on the walls with a collage feel.  When I tried that it just felt busy.  Maybe my style is a little more simple/uncluttered?

Tuesday, July 23, 2013

Updating Sophia's Room


Recently I have painted all the trim upstairs white including all the bedrooms.  I ended up painting the walls in Sophia's room to be a lighter green.  Since we are finished with her crib bedding, it seemed like a good time to update her curtains and bedding. Click here to see her old room.  This is still a work in progress, but I have completed the roman shade and valance.  For the roman shade, I took apart an old one I had gotten from Target and used a green polka dot fabric that will also appear in her quilt.  My next project is a new quilt for her bed. 


Friday, June 7, 2013

Simple pleasures


All our local thrift stores had 50% off on Memorial Day.  I actually spent three and half hours in one store and ended up with lots of cute clothes.  One of my favorite finds was this pot for $3.  I grabbed some thyme from my herb garden and a hen and chick out out of my back yard to fill it.  


Friday, August 24, 2012

Patio Refresh


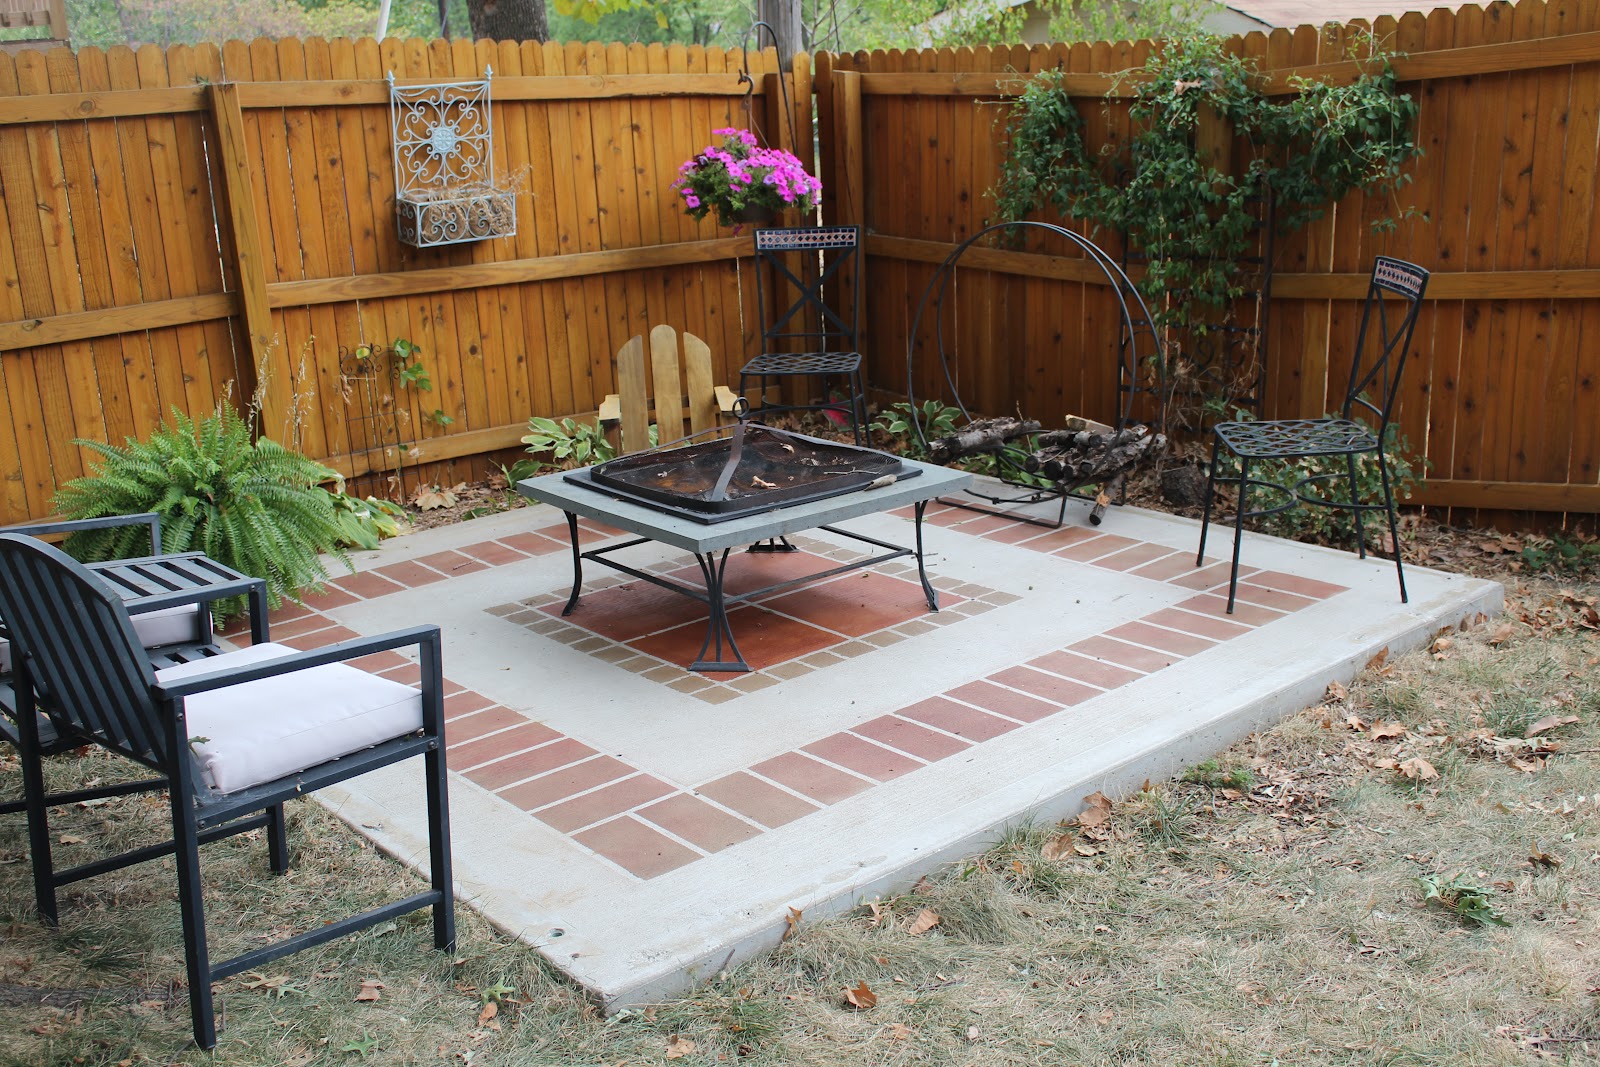
 I knew when we tore down our termite-infested shed, that I wanted to use the concrete slab for a fire pit area.  But I didn't get the idea to stain it to look like tile until I saw it done at a friends house.  I would have done the entire area, but I ran into a hitch when I remembered there is some leftover glue or caulk all around the edges.  So I decided to leave some areas just plain concrete.  I am happy with the affect.


My favorite part about this project is that it cost so little and only took a little over two hours!  I power washed a few days before. Using a really big ruler and pencil I laid out the design, then used 1/2 inch masking tape.  I used the sides of a large cardboard box to cover the areas to be left plain. It cost about $30 for four cans of spray paint concrete stain.  I was going to stop there, but several friends suggested that I do a sealer, so I bought that for another $30 and it took about 15 minutes to roll on.  


This is the before picture.  It was taken the day we took the old shed down.  That is the roof of the shed laying on the concrete slab.  

Sunday, August 5, 2012

Fairy Garden


Sophia received these fairy houses for her birthday and all the kids had fun helping me set up our new fairy garden using things we found around the house and in our yard.


Sunday, April 8, 2012

A New (old) Look for Grandma's Sewing Cabinet


I inherited this great sewing machine from the 1940s from my grandma.  It works great, and has all sorts interesting attachments (which I haven't figured out how to use yet).  It is actually hardwired into this cabinet.  The style isn't exactly my taste.  I don't care for dark wood and I had a particular aversion to the trim which also served as the handles for the drawers and door.  So my mom and I set to work to refinish it in a style that suited us both better.

As you can see, the top was used and abused.  I like distressed, but not this kind of distressed.


My Inspiration for the finish...

Day one: We pried off the old trim and basically tried to spackle with wood filler.  I'm sure that may not be the right way, but it got the job done.  Then we sanded like crazy with an electric sander and primed.  It needed two coats of primer because the red varnish was showing through where we hadn't sanded all the way. 
Day two: First I painted some light blue on the edges and anywhere I wanted to show through later.  We used a tea light candle to rub on these areas to make it easier to sand off the white later.  Next, two coats of white paint. 

Day three: We painted the inside a light blue, so when the table is open and in use you will see it.  When the table is closed, the only blue you see is along the routered edge and handles.

Before distressing and oil

Day 4:  The fun part, we took the electric sander to the whole thing and distressed it.  Then we rubbed a dark walnut oil on to take away the stark white and make it look it's age.  


The handles were $2.50 at hobby lobby.  They had a dark metal finish.  We painted them with our light blue paint (no primer needed), and sanded the edges to show the scroll work. 


Here is what it looks like when opened up in use.


 The blue work surface we sanded to give it this two toned look.


For the door we used a smaller knob which seemed too small compared to the larger pulls on the drawers, so we added some wood scrolls.


Tuesday, March 13, 2012

House Redo


We have been in our cozy house for 6 years in June.  We have slowly updated each room with mostly just paint, light fixtures and accessories (ok, we did splurge on new kitchen appliances and granite tile counters).  And I thought it would be fun to post all the before and afters.

Kitchen
Before

It always has to get worse before it gets better...


 After

Before

After


 Living Room
When we moved in our living room was a white box.

Before


After


After


 Bedroom
Before

After

After

After


Bathroom
Before

During

After

After